
Fountain Pen Sketching Techniques: A Masterclass for Analog Artists in 2026
A fountain pen is not a fragile relic; it is the most dynamic mark-making tool in an artist's kit. You might hesitate to press a precision nib to paper, fearing a permanent smudge or a ruined tip. It's common to feel limited by inconsistent line weights or the unpredictability of ink on non-absorbent surfaces. However, once you understand the relationship between gravity, steel, and pigment, these tools offer a level of expression that pencils simply cannot match. Mastering professional fountain pen sketching techniques will transform your approach to analog art.
This masterclass provides the technical foundation you need to sketch with total confidence. We will explore how to select the perfect nib, from the reliable Lamy Safari to the high-capacity TWSBI Eco. You'll also learn to utilize 2026's most expressive chromatography-rich inks, such as Sailor Manyo Haha, on industry-standard Midori MD paper. We'll guide you through the process of creating atmospheric depth with ink washes and precise textures that take full advantage of your pen's unique flow.
Key Takeaways
- Protect your investment by mastering the "Zero-Pressure Rule," ensuring your nib glides effortlessly across the page without risk of damage.
- Develop professional fountain pen sketching techniques including hatching and scumbling to create depth and realistic textures in every drawing.
- Learn to utilize the water-solubility of premium inks to "pull" shadows and create painterly washes with a single brush stroke.
- Discover the synergy between specific nib sizes and Japanese stationery like Midori MD to eliminate ink feathering and smudging.
- Curate a portable analog studio by selecting the right combination of high-capacity pens and modular journaling systems for on-the-go art.
The Fundamentals of Fountain Pen Line Work
Fountain pen sketching is a dialogue between fluid dynamics and the paper's surface. Unlike a ballpoint pen, which requires downward pressure to rotate a metal ball, a fountain pen relies on capillary action. This mechanism pulls ink from the reservoir through a precision-cut feed and onto the paper via surface tension. This effortless delivery allows for the subtle nuances found in the Fundamentals of Drawing, where the artist's lightest touch dictates the emotional weight of the mark. Using fountain pen sketching techniques effectively starts with understanding this physical relationship between the nib and the ink.
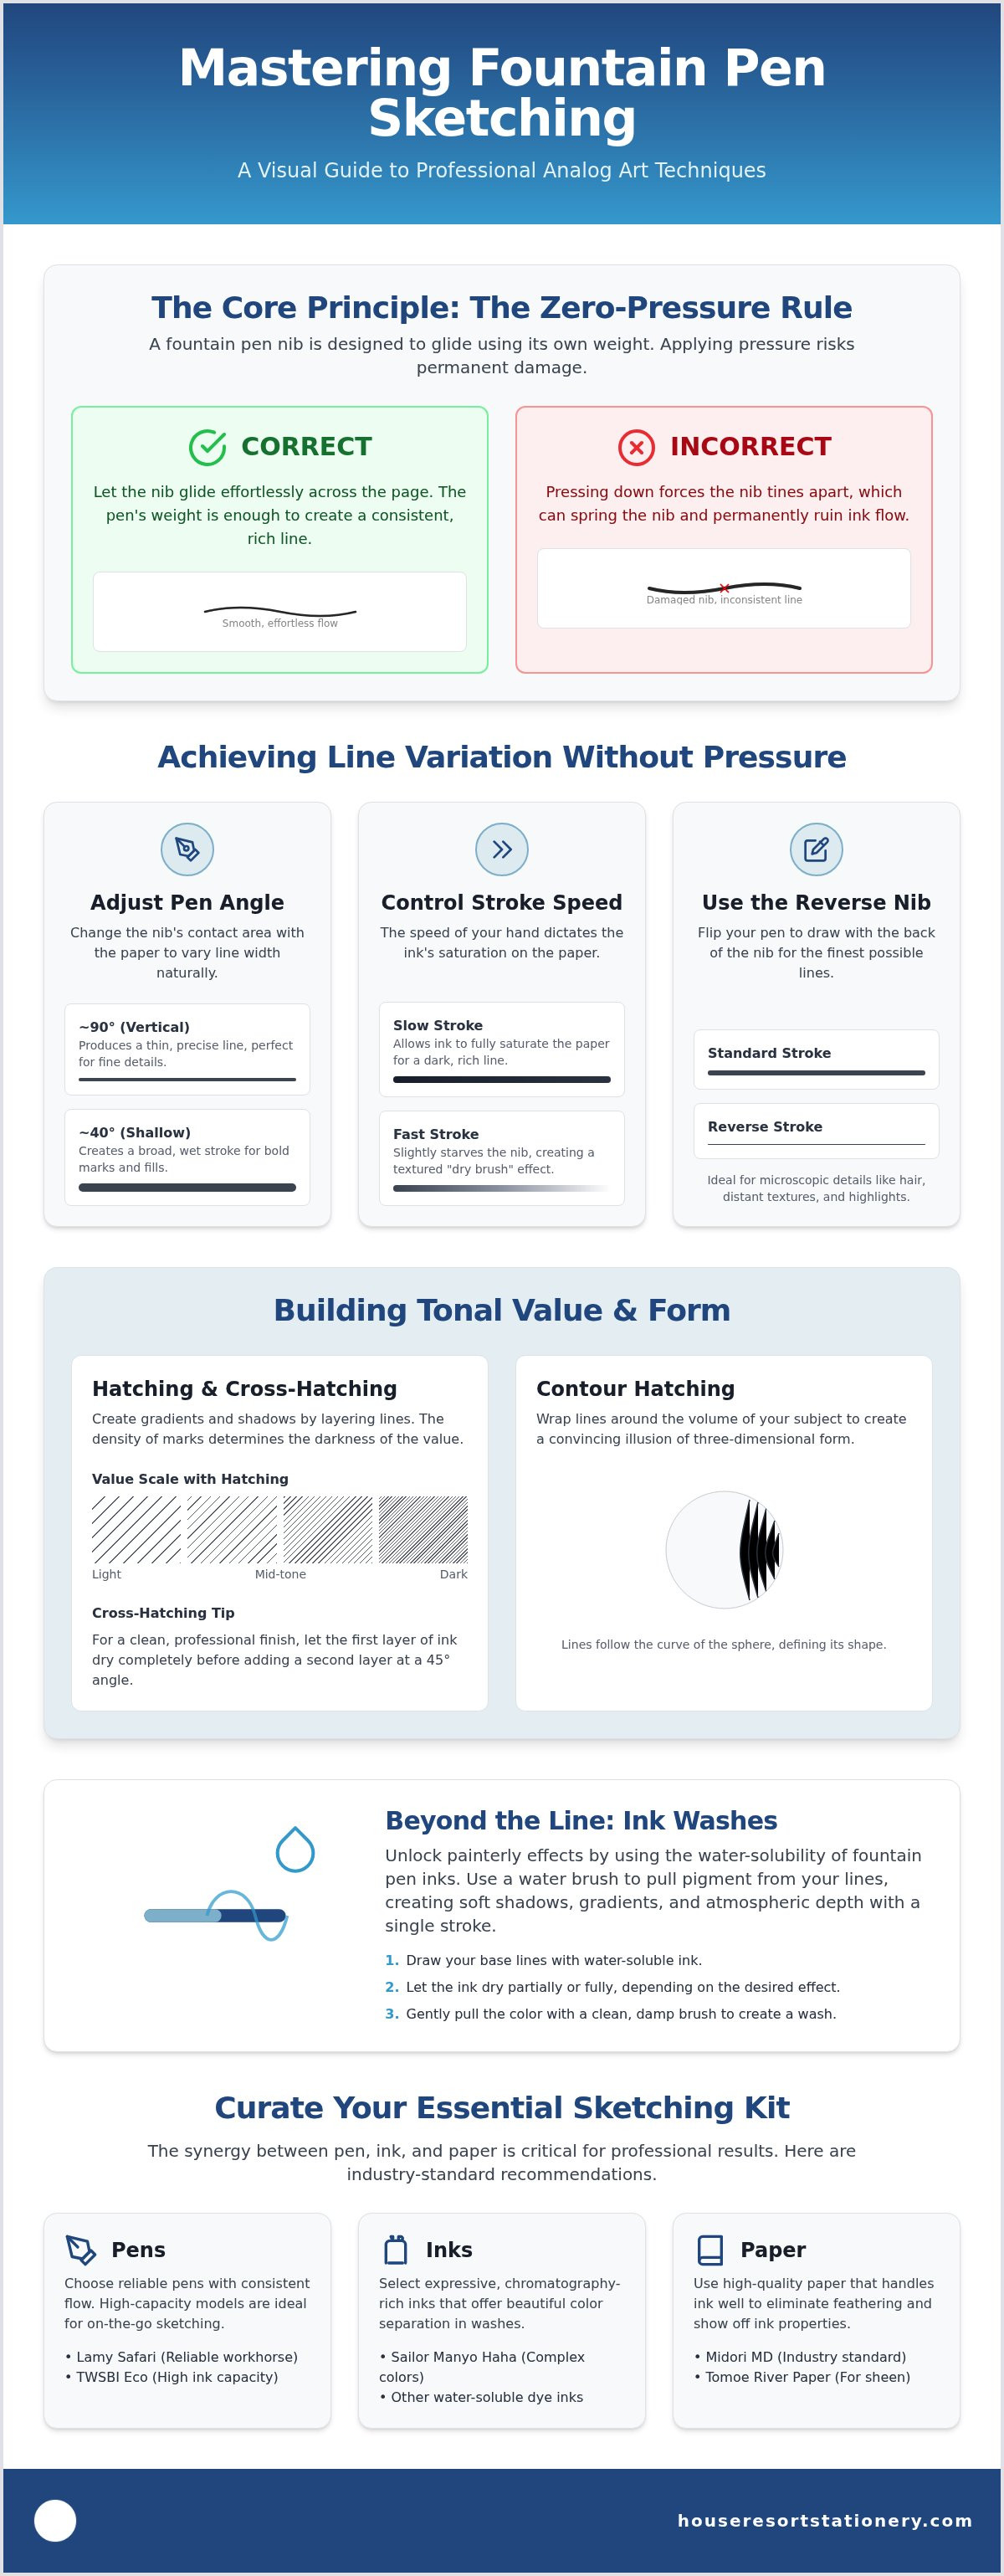
The "Zero-Pressure" Rule is the most critical habit for any analog artist to adopt. A high-quality nib, such as those found on a Lamy Safari or a Sailor, is designed to write under its own weight. Pressing into the page doesn't just widen the line; it risks "springing" the tines and permanently damaging the pen's alignment. If your ink is flowing correctly, the nib should glide across the fibers without any vertical force. This lack of resistance reduces hand fatigue during long drawing sessions and preserves the integrity of your tools.
You can achieve remarkable variety in line weight simply by adjusting your pen's angle. Holding the pen nearly vertical, around 80 to 90 degrees, produces a thin, controlled line perfect for architectural precision. Lowering the pen to a 40-degree angle increases the contact area of the tipping material, resulting in a broader, wetter stroke. Additionally, the "feedback" of a nib is a valuable asset. A "toothy" nib provides tactile resistance that helps you feel the paper's grain; this friction prevents the pen from sliding uncontrollably during fast, expressive sweeps.
The Reverse Nib Technique for Fine Details
Flipping your pen upside down to draw with the back of the nib is a professional secret for achieving "extra-extra-fine" lines. This technique is ideal for rendering delicate highlights in hair, distant horizon lines, or fine architectural textures. When drawing in reverse, you must be especially careful not to apply pressure. The tines are less supported in this orientation, and excessive force can cause misalignment. Use this method sparingly to add a layer of microscopic detail that standard strokes cannot provide.
Controlling Ink Flow with Stroke Speed
Ink flow is a time-dependent process. A slow, deliberate stroke allows the feed to saturate the paper fibers, creating a dark, rich, and saturated line. Conversely, a rapid flick across the page often starves the nib slightly. This results in a textured "dry-brush" effect that suggests movement, speed, or light. To master this, practice a "gradient of speed" exercise on a sheet of Midori MD paper. Start a long horizontal line very slowly and gradually accelerate your hand until the ink begins to break up into a textured trail. This control allows you to suggest energy and atmosphere without changing pens.
Mastering Tonal Value through Hatching and Cross-Hatching
Value in fountain pen art isn't created by pressing harder. It's built through the strategic placement of individual marks. When you master fountain pen sketching techniques like hatching, you're essentially mapping the topography of your subject. Each line acts as a vector that defines a three-dimensional plane. By increasing the proximity of these lines, you reduce the amount of visible paper, which the eye perceives as a darker tonal value. This logic of the line allows you to build gradients that feel structured rather than accidental.
Cross-hatching adds a secondary layer of complexity and depth. For a professional finish, aim for 45-degree intersections between your layers. This specific angle prevents the lines from stacking in a way that looks like a rigid grid, creating a more organic and sophisticated shadow. It's vital to let your first layer of ink dry completely before adding the next. Working on wet paper can lead to feathering, where the ink spreads into the fibers. This results in a muddy, indistinct texture that loses the crispness characteristic of fine pen work. Patience is as much a tool as the pen itself.
Directional Hatching for Form
Contour hatching is the art of wrapping your lines around the imaginary volume of an object. If you draw straight, parallel lines across a curved subject like a piece of fruit or a human limb, you'll inadvertently flatten the form. Instead, use crescent strokes that follow the object's surface. For example, when sketching a simple sphere, your hatch marks should be shorter and more curved near the edges, gradually straightening as they approach the center point closest to the viewer. This technique tricks the brain into seeing three dimensions on a two-dimensional page.
Cross-Contour Techniques
For more complex subjects like human anatomy or drapery, cross-contour techniques provide the ultimate structural framework. This involves combining horizontal and vertical contour lines to create a mesh that describes the surface. You can prioritize your light source by using varied line weights within these hatches. Use a finer nib for the lighter edges of a shadow and a broader, more consistent nib for the core. The Lamy Safari is an excellent choice for this work because its reliable ink flow ensures every hatch mark remains uniform in saturation.
To truly see these techniques come to life, it helps to pair your pen with a paper that can handle multiple layers of ink without bleeding. You might consider exploring our collection of premium Japanese notebooks to find the perfect surface for your next masterpiece.
Expressive Textures: Scumbling, Stippling, and Contouring
While hatching provides the structural framework of a drawing, expressive textures breathe life and atmosphere into the composition. Moving beyond the rigid geometry of planes, we enter the realm of organic mark-making. Here, fountain pen sketching techniques allow you to mimic the chaotic beauty of the natural world, from the rugged surface of a stone wall to the soft drift of a summer cloud. Mastering these textures requires a shift in mindset; you must move from drawing "objects" to drawing "sensations" of light and surface.
One of the most effective ways to suggest form without heavy outlines is the "broken line" technique. By intentionally leaving gaps in your borders, you allow the viewer's eye to complete the shape. This creates a lighter, more ethereal feel that is perfect for sketching distant landscapes or delicate glass. It prevents your work from looking like a rigid coloring book and instead suggests a professional, airy sophistication. Combining this with blind contour drawing, where you sketch while looking only at your subject and not your paper, will sharpen your hand-eye coordination and improve your ability to see true proportions.
Creating Organic Textures with Scumbling
Scumbling is often dismissed as mere doodling, but it's actually a highly controlled method of building value through "O" and "S" stroke patterns. By overlapping these loopy, irregular scribbles, you can create dense, tangled textures that perfectly mimic botanical realism or weathered stone. This technique works best when paired with shading inks that exhibit high tonal variety. As you can see in our Pilot Iroshizuku guide, these inks pool at the edges of your scribbles, creating a natural variation in color that adds immediate depth to your foliage or clouds.
Precision Stippling and Nib Safety
Stippling is the ultimate test of an artist's patience. It involves creating a gradient or shadow through thousands of individual dots. While this produces the softest transitions from deep shadow to pure white paper, it can be hazardous to your tools if done incorrectly. You should never "tap" or "hammer" your nib against the page. This impact can misalign the tines or damage the delicate tipping material. Instead, use the "touch-and-lift" method. Gently touch the nib to the paper until the ink transfers, then lift it vertically. This ensures your dots remain crisp and your nib remains perfectly aligned for years of service.
For those long stippling sessions, using a pen with a consistent, reliable flow is essential. A well-maintained feed ensures that every dot is identical in saturation, preventing your shadows from looking patchy or uneven. Whether you're using a heritage Sailor or a modern Kaweco, the goal is a rhythmic, meditative application that respects both the paper and the tool.
Beyond the Line: Ink Washes and Water-Soluble Techniques
A fountain pen is more than a precision instrument for line work; it is a reservoir of concentrated pigment. By introducing water to your drawing, you unlock a painterly dimension that blurs the line between sketching and watercolor. This transition from line to wash is one of the most versatile fountain pen sketching techniques available to the modern analog artist. It allows you to create atmospheric depth and soft gradients using nothing but your pen and a wet brush. This wet-on-dry approach maintains the structural integrity of your initial marks while adding a layer of fluid sophistication.
The beauty of this method lies in the chemistry of the ink itself. Many modern formulations feature high chromatography. This means the dyes within a single bottle can separate into multiple colors when they encounter water. A deep blue might reveal hints of pink at the edges, while a grey ink might split into subtle purples and greens. Shading inks amplify this effect, naturally pooling in shadow areas to create luminous gradients without the need for extra effort. This "hidden" color palette adds a professional, multi-tonal quality to your sketches that single-pigment tools cannot replicate.
Selecting Inks for Artistic Wash
Success in ink washing depends entirely on your choice of material. Water-resistant inks, like the De Atramentis Document series, stay fixed on the page, making them ideal for outlines you plan to paint over. However, for true wash techniques, water-soluble options are essential. Pilot Iroshizuku bottled ink is the gold standard for this purpose. Its reliable flow and high solubility allow you to pull incredibly smooth gradients. Always test your collection by creating a "bleed chart" on Midori MD paper to see exactly how much pigment each ink releases when touched by water.
The "Pulling" Technique
This three-step method is the foundation of monochromatic ink painting. First, draw your primary contour lines with a medium-flow pen. Second, while the ink is still slightly damp, touch a water brush to the edge of the line. Finally, drag the released pigment into your shadow areas. This technique allows you to suggest volume and light with extreme precision. The line provides the detail, while the wash provides the form. To find the perfect medium for these experiments, explore our curated selection of shading inks and professional-grade paper.
Curating Your Sketching Kit: Pens, Paper, and Ink
The final pillar of artistic success is the "Golden Trio": the precise harmony between your nib, your ink, and your paper. Even the most advanced fountain pen sketching techniques will fail on low-quality paper that absorbs ink too quickly, causing feathering and bleed-through. To achieve professional results, you must view your kit as an integrated system. A well-curated selection ensures that your tools respond predictably to every stroke, allowing you to focus entirely on the creative process rather than fighting your materials.
For artists who prefer working in the field, the Traveler’s Notebook has become the preferred portable studio. Its modular design allows you to swap out different paper weights and textures depending on your project. Many urban sketchers also incorporate a Fudé, or bent nib, into their setup. This specialized tool allows you to vary your line weight from a hairline to a broad stroke simply by changing the angle of your hand, effectively acting as a brush and a pen in a single body.
Versatile Nibs for the Artist
Selecting the right nib size dictates the primary "voice" of your sketch. An Extra-Fine (EF) nib provides the surgical precision required for architectural renderings or microscopic cross-hatching. Conversely, a Broad (B) nib offers the graphic impact needed for bold, high-contrast compositions. If you plan on long-form sketching sessions, the TWSBI Eco is a standout choice; its piston-filler mechanism holds a massive volume of ink, ensuring you won't run dry in the middle of a wash. For spontaneous marks, the Kaweco Sport remains the ultimate pocket pen, combining heritage durability with a compact form that fits into any travel kit.
The Canvas Matters: Paper Selection
The surface finish of your paper significantly affects line control and ink behavior. Smooth papers allow for rapid, frictionless movement, while textured surfaces provide the "tooth" necessary for slower, more deliberate work. Japanese stationery like Midori MD and Hobonichi is specifically engineered with surface sizing that keeps the ink on top of the fibers. This prevents feathering and allows for the "sheen-show" and complex shading discussed in previous sections. When evaluating a new sketchbook, always check for three things: its resistance to bleed-through, its ability to hold a wet wash without warping, and how clearly it reveals the secondary colors within your ink.
Elevate Your Analog Artistry
Mastering professional fountain pen sketching techniques is a journey of understanding the delicate balance between pressure and flow. By respecting the "Zero-Pressure" Rule and exploiting the multi-tonal properties of chromatography-rich inks, you transform a simple line into a three-dimensional form. Whether you're building depth through 45-degree cross-hatching or "pulling" a soft monochromatic wash with a water brush, your success depends on the synergy of your materials. The right combination of a precision nib and ink-friendly Japanese paper ensures your marks remain crisp and intentional.
As an authorized retailer for heritage brands like Sailor, Lamy, and TWSBI, we specialize in the tools that make these artistic outcomes possible. Our expert curation focuses on the tactile joy of the analog experience, providing the high-quality canvas and flow you need for every session. Explore our curated collection of artist-approved fountain pens and premium paper to find your next favorite tool. Your sketches deserve the reliability and craftsmanship that only the finest stationery can provide. We can't wait to see the textures and depths you create.
Frequently Asked Questions
Can I use any fountain pen for sketching?
You can use almost any fountain pen for sketching, provided the ink flow is consistent and the nib matches your desired line weight. While a standard office pen works, artists often prefer models like the Lamy Safari for its durability or the TWSBI Eco for its large ink reservoir. The key is ensuring the pen can handle the quick, varied strokes required for most fountain pen sketching techniques without skipping.
Is it safe to use waterproof ink in my fountain pen?
It's perfectly safe to use waterproof fountain pen inks, such as the De Atramentis Document series or Platinum Carbon Black, as long as they're specifically labeled for fountain pens. These are pigment-based rather than dye-based, which requires a more diligent cleaning routine. To prevent clogging, flush your pen every one to two weeks. Never use India ink or calligraphy ink, as these contain binders that will permanently damage the internal feed system.
How do I prevent my ink from smudging while I draw?
Preventing smudging requires a combination of quick-drying ink and paper that controls absorption. Japanese stationery like Midori MD is engineered to keep ink on the surface, which helps it dry predictably without feathering. If you're a left-handed artist, consider an Extra-Fine nib to limit the amount of wet ink on the page. You can also use a bridge or a piece of scrap paper under your hand to protect your work.
What is the best nib size for a beginning sketcher?
A Fine or Medium nib offers the most versatility for those just beginning to explore fountain pen sketching techniques. These sizes provide a balance between precision for detail and enough ink flow for smooth hatching. As you gain confidence, you might experiment with an Extra-Fine nib for architectural work or a Fudé nib for expressive, brush-like variations in a single stroke. Choosing a reliable starter like a Kaweco Sport ensures a consistent learning experience.
Do I need special paper for fountain pen sketching?
High-quality, fountain pen friendly paper is essential for technical success because it prevents ink from spreading uncontrollably. Standard printer paper or cheap sketchbooks often absorb ink too quickly, which ruins fine line work and makes washes impossible. Brands like Midori and Hobonichi use specific surface sizing that allows the ink to dry slowly. This reveals the true shading and sheen of your ink, making them the industry standard for analog artists.
How do I clean my pen after using pigment-based drawing ink?
Clean your pen by flushing the nib and feed with clean, room-temperature water until it runs clear. If you use waterproof pigment inks, this should be done every ten to fourteen days to prevent particles from settling in the feed. For stubborn clogs, use a specialized pen flush solution. Avoid using hot water or alcohol, as these can warp the internal components or damage the pen's finish. A rhythmic cleaning schedule preserves your pen's longevity.
Can I mix different fountain pen inks to create new colors for my art?
You should generally only mix inks from the same manufacturer and series to avoid adverse chemical reactions. Mixing different brands can occasionally cause the ink to thicken or form a precipitate that clogs the feed. If you want to experiment, do so in a small vial first and let it sit for twenty-four hours. This ensures the mixture remains stable before you fill your favorite pen. Always prioritize the safety of your heritage nibs.
What happens if I press too hard while sketching with a fountain pen?
Pressing too hard disrupts the delicate balance of the metal tines, leading to scratchy writing or a total loss of ink flow. Fountain pens are designed to write with zero pressure, relying on capillary action rather than force. If you find yourself pressing down to get a darker line, it's better to switch to a broader nib or a more saturated ink. Excessive force can "spring" the tines, which often requires professional repair or a total nib replacement.