
How to Change a Fountain Pen Nib Safely: A Connoisseur’s Guide for 2026
What if your most cherished fountain pen could transform from a precise fine liner into a bold stub italic in less than a minute? Many enthusiasts view their pens as fixed artifacts, yet the true joy of ownership lies in intentional customization. Learning how to change a fountain pen nib safely is a ritual of precision that allows you to tailor every stroke to your specific project. While the fear of misaligning a delicate gold tine or cracking a vintage ebonite feed is real, these risks are easily managed with the right environment and a patient hand.
You likely agree that the tactile connection between paper and point is the most vital part of the analog experience. We promise to help you master this delicate art, providing the professional techniques needed to swap nibs without risking damage to your finest pens. Below, we will examine the mechanical differences between modern screw-in nib units and traditional friction fit systems. You will also discover the essential tools and gripping methods that ensure a perfectly aligned, smooth writing result every time you decide to refresh your favorite pen.
Key Takeaways
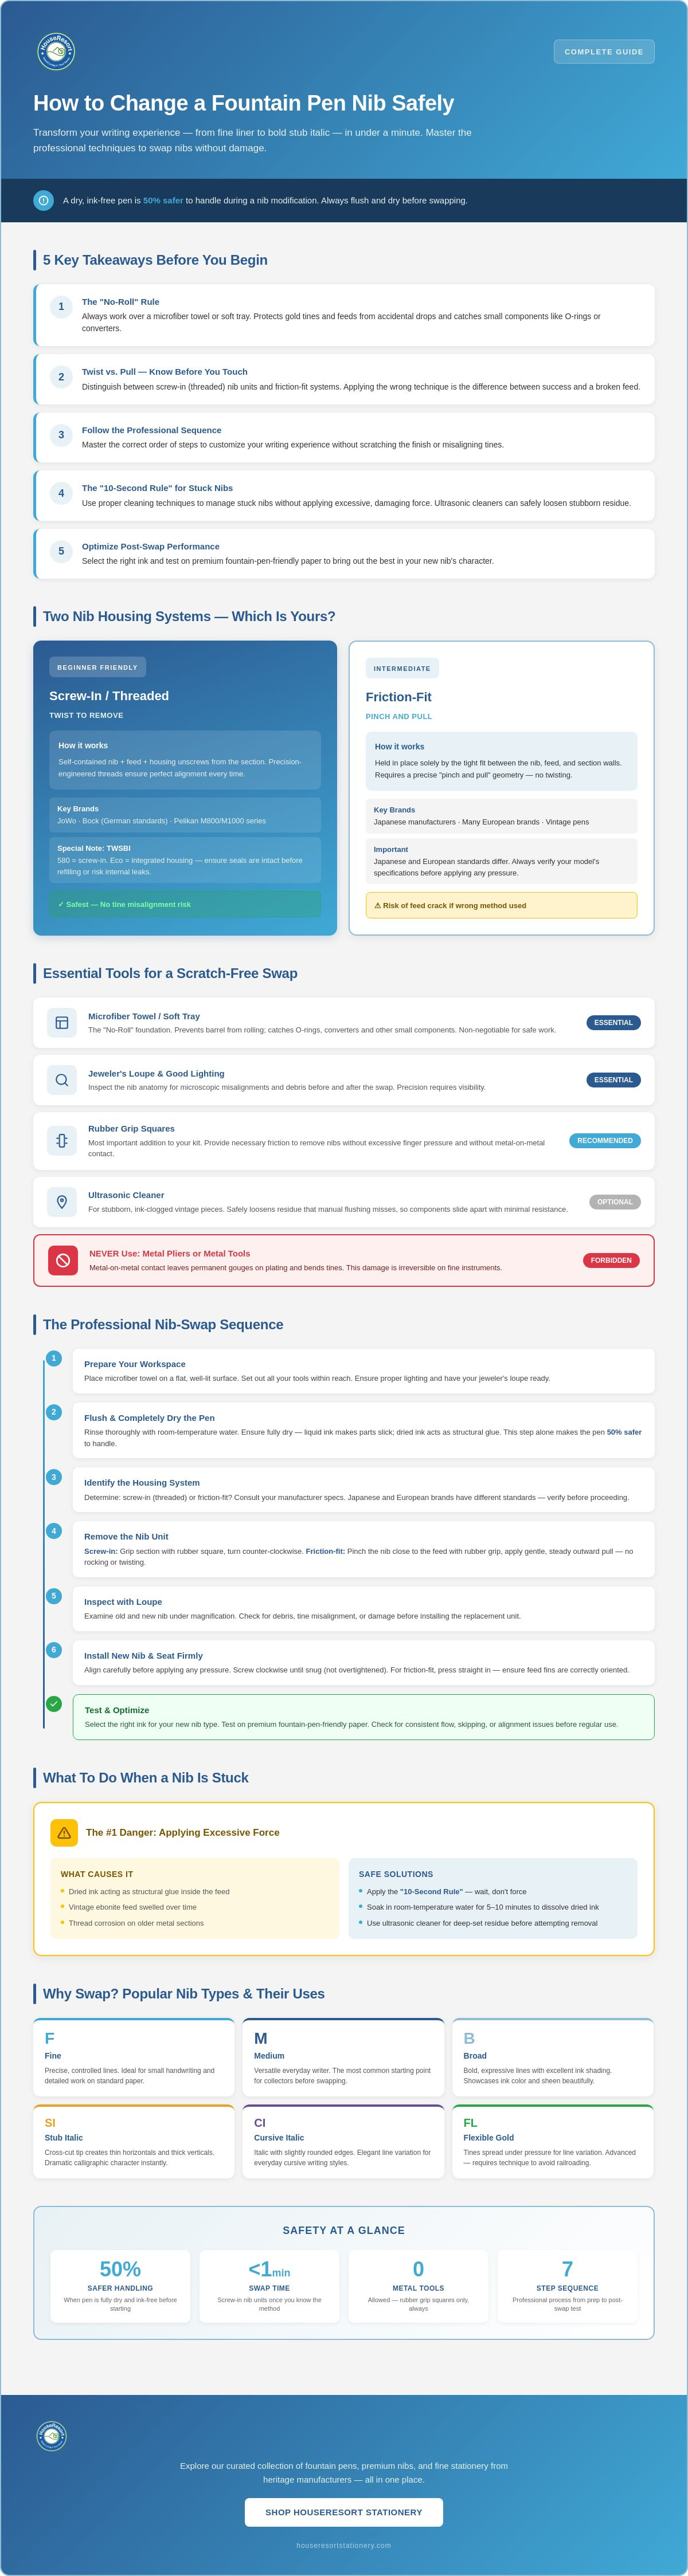
- Establish a secure workspace using the "No-Roll" rule to protect delicate gold tines and feeds from accidental drops.
- Distinguish between user-friendly screw-in units and the technical "Pinch and Pull" geometry required for friction-fit systems.
- Master the professional sequence for how to change a fountain pen nib safely to customize your writing experience without scratching the finish.
- Utilize the "10-Second Rule" and proper cleaning techniques to manage stuck nibs without applying excessive, damaging force.
- Learn how to optimize your new nib's performance through strategic ink selection and testing on premium, fountain-pen-friendly paper.
The Foundation of Safe Nib Swapping: Preparation and Tools
Swapping a nib is the quickest way to breathe new life into a cherished writing instrument. Collectors often switch from a standard medium to a cursive italic or a flexible gold point to match a specific ink or paper. Mastering how to change a fountain pen nib safely begins long before you touch the metal. It starts with a controlled environment and a deep appreciation for the delicate tolerances involved in fine stationery.
A "No-Roll" rule is your primary defense against heartbreak. Always perform your work over a microfiber towel or a dedicated soft tray. This prevents the pen barrel from rolling off the desk while you focus on the nib. It also catches small components like O-rings or converters that might otherwise vanish. Proper lighting is equally vital. A jeweler’s loupe allows you to inspect the anatomy of a fountain pen nib for microscopic misalignments or debris before and after the swap. Precision requires visibility.
A dry, ink-free pen is 50% safer to handle during a modification. Liquid ink acts as an unwanted lubricant, making small parts slick and difficult to grip. Conversely, dried ink acts like a structural glue, binding the feed to the section. Always flush the pen thoroughly with room-temperature water and ensure it's completely dry before attempting a swap. This simple step reduces the force required and protects the internal housing from stress fractures.
Essential Tools for a Scratch-Free Experience
Specialized rubber grip squares are the most important addition to your kit. They provide the necessary friction to remove a nib without requiring excessive finger pressure. You should never use pliers or metal tools on any part of a pen. Metal-on-metal contact will leave permanent gouges on the plating or bend the tines. For stubborn, ink-clogged vintage pieces, an ultrasonic cleaner can safely loosen residue that manual flushing misses. This ensures the components slide apart with minimal resistance.
Identifying Your Pen’s Nib Housing System
Before you apply any pressure, you must identify the housing system. Many modern pens utilize threaded nib units. These are self-contained housings that simply unscrew from the section. They are the gold standard for safety and ease. In contrast, friction-fit nibs are held in place solely by the tight fit between the nib, the feed, and the section walls. Japanese manufacturers often have different standards than European brands. If you are unsure of the specifications for your specific model, consulting a japanese stationery online store can provide the technical details needed for a successful 2026 collection update. Knowing whether to twist or pull is the difference between a successful customization and a broken feed.
How to Change Pre-Assembled Nib Units Safely
Screw-in nib units represent the pinnacle of user-friendly maintenance for the modern collector. These components allow you to swap an entire assembly, including the nib, feed, and housing, without ever touching the delicate tines. This modular approach is central to the modern technical design of a fountain pen, where precision-engineered threads ensure perfect alignment every time. For beginners, mastering how to change a fountain pen nib safely is most easily achieved through these self-contained systems. They eliminate the risk of misaligning the nib on the feed, which is the most common cause of a poor writing experience.
JoWo and Bock stand as the industry standards for high-end custom pens and heritage brands alike. These German-made units are found in countless luxury instruments, providing a reliable, standardized threading system. When you are ready to expand your collection, explore our curated selection of fine fountain pens from heritage manufacturers to see these systems in action. Similarly, Pelikan utilizes a highly refined screw-in system that has remained consistent for decades, allowing connoisseurs to move nibs between different generations of the M800 or M1000 series with ease.
Unique considerations apply to piston-fillers like the TWSBI 580 and the TWSBI Eco. While the 580 features a traditional screw-in unit, the Eco requires a more delicate touch due to its integrated housing. Because these pens hold ink directly in the barrel, you must ensure the housing is fully seated and the internal seals are intact before refilling. A loose unit in a piston-filler doesn't just cause a skip in your writing; it can lead to a significant leak inside the cap.
The Lamy Slide: A 2026 Safety Protocol
The Lamy system is a unique hybrid found on the Safari and Al-Star models. To change these nibs safely, use the "cap-pull" technique. Secure a piece of household tape to the top of the nib and gently pull, or use the inner liner of the pen cap to catch the nib's shoulders and slide it forward. This prevents you from putting pressure on the tines. Before sliding the new nib on, check the "wings" on the underside. They should be tight enough to grip the feed securely but not so tight that they scratch the plastic. A successful swap ends with a tactile click as the nib centers itself on the feed.
Screw-In Units: JoWo, Bock, and Pelikan
When handling a full nib unit, always grasp the nib and feed together as a single piece. This prevents the nib from shifting sideways during the rotation. Apply the "Two-Finger" rule for torque; only tighten the unit until you feel the first sign of resistance. Over-tightening can crack the grip section or deform the O-ring. This tiny rubber ring is a hidden safety feature that prevents ink from creeping into the threads. If the O-ring looks flattened or frayed, replace it immediately to maintain a leak-proof seal. A meticulous approach here ensures your pen remains as functional as it is beautiful.
Mastering the Friction-Fit Pull: Intermediate Techniques
Friction-fit systems represent a more intimate connection with your writing instrument. Unlike modular screw-in units, these nibs and feeds are held in place solely by the tight tolerances of the grip section. This design is common in many Japanese pens and vintage restorations. Understanding how to change a fountain pen nib safely in these models requires a steady hand and an awareness of the "Pinch and Pull" geometry. You aren't just moving metal; you're managing the delicate friction between three distinct components.
The golden rule of the friction-fit pull is a strict commitment to a straight line. You should never wiggle or rock the nib from side to side. Side-to-side movement can widen the section opening or, worse, snap the delicate fins of the feed. Your fingers must act as a precision vice. If the assembly feels immobile, refer to an expert guide to swapping fountain pen nibs to determine if a soak is necessary before proceeding. Most modern pens will yield to firm, consistent pressure when gripped correctly.
Before removal, look for alignment markers. Many manufacturers include a small notch or a flat side inside the section to guide the feed. Take a mental note or a quick photo of the nib's depth and orientation. This ensures that when you reassemble the pen, the ink flow remains consistent and the cap still fits securely over the nib unit.
The Proper Grip: Protecting the Tines and Feed
Your grip should focus on the "shoulders" of the nib rather than the tip or the breather hole. Placing pressure on the very tip can easily spring the tines, ruining the nib's alignment. Wrap your rubber grip square around the nib and feed to create a 360-degree non-slip surface. Position your thumb firmly on the face of the nib and your index finger against the underside of the feed. This distribution of force prevents the nib from sliding independently of the feed during the pull, which is essential for protecting the delicate plastic components.
Aligning the Nib and Feed for Reinsertion
Reinsertion is a "Feed-First" process. Before you push the assembly back into the section, perform a visual check to ensure the nib’s center slit is perfectly aligned with the feed’s primary ink channel. Any deviation here will lead to skipping or a completely dry pen. Dry-fit the assembly by sliding it halfway in to feel for the internal notch. Once you find this "sweet spot," apply a final, firm push until the nib sits flush against the section wall. It should feel seated and secure, with no visible gaps that could allow air to enter the ink chamber.
Safety Troubleshooting: What to Do When a Nib is Stuck
Precision and patience are the hallmarks of a true collector. When you encounter resistance, the most important tool in your kit is the 10-Second Rule. If a nib or feed does not budge with moderate, controlled pressure within ten seconds, stop immediately. Applying excessive force is the primary cause of cracked sections and snapped feed fins. Learning how to change a fountain pen nib safely involves knowing when to retreat and reassess the situation. Force is a blunt instrument; maintenance requires a scalpel.
Dried ink is the most common culprit behind a "stuck" assembly. Over time, ink particulates can calcify inside the tight tolerances of the grip section, acting as a powerful adhesive. This chemical bond can mimic a mechanical jam, making a friction-fit nib feel as though it's permanently welded to the pen. Before you attempt another pull, consider the orientation of your pen's housing. Many manufacturers, particularly Japanese brands like Pilot or Sailor, utilize "keyed" sections. These housings feature flat internal surfaces or notches that only allow the nib and feed to enter or exit in one specific orientation. Attempting to twist a keyed unit will cause immediate, irreparable damage to the plastic housing.
Temperature plays a subtle but vital role in the physical expansion of pen materials. A lukewarm soak is always safer than raw physical force. While heat can help loosen some stubborn parts, never use boiling water or hair dryers. Extreme heat can warp ebonite feeds or cause precious resin to become brittle. A gentle, room-temperature environment is the only safe space for high-end instrument repair. If your current pen is showing signs of structural fatigue, it may be time to browse our collection of fine fountain pens to find a modern, modular replacement that simplifies the maintenance process.
Dealing with Ink Calcification
A 24-hour soak protocol is the standard treatment for ink-related jams. Submerge the grip section in distilled water with a single drop of clear dish soap. This solution breaks down the surface tension of the dried ink, allowing the water to penetrate the deepest recesses of the feed. For more stubborn cases, use a bulb syringe to flush the section from the back. The hydraulic pressure created by the syringe can often push the nib and feed forward just enough to break the ink seal, allowing for a safe manual removal.
When to Consult a Professional Nibsmith
Recognizing your limits is a sign of expertise, not failure. If you detect fine, hairline cracks in the grip section or notice that the metal tines are "splaying" outward under pressure, cease all DIY efforts. These issues require the specialized tools of a professional nibsmith to prevent total part failure. Vintage pens manufactured before 1960 require an entirely different safety standard. Materials like celluloid and early plastics are significantly more brittle than modern resins. These heritage pieces often require ultrasonic vibration or specific heat-control methods that are beyond the scope of home maintenance.
Post-Swap Care: Testing and Optimizing Your New Nib
The ritual of customization concludes with the first stroke of ink on paper. After mastering how to change a fountain pen nib safely, the focus shifts from mechanical stability to writing performance. Your new nib requires a controlled environment to prove its worth. Avoid testing with shimmering or high-sheen inks initially; these can mask flow issues or create false positives for clogging. Instead, choose a reliable, wet-flowing ink that provides a clear baseline for performance. This allows you to isolate the nib's behavior from the ink's chemistry.
Paper selection is equally critical. Testing a newly installed nib on absorbent, low-quality paper will hide the nuances of its grind and may lead to "feathering" that obscures alignment issues. Use a premium, fountain-pen-friendly journal to ensure you're feeling the nib's true feedback. Once you're satisfied with the flow, this newly customized tool becomes a perfect companion for fountain pen doodle journaling for beginners, where varying line weights and angles test the limits of the nib's versatility. If the writing feels scratchy, use a jeweler's loupe to check if one tine sits higher than the other. A "gentle nudge" with a fingernail on the shoulder of the higher tine can often bring the points back into perfect horizontal alignment.
Testing Flow with Premium Inks
For a definitive assessment, many connoisseurs believe Pilot Iroshizuku bottled ink is the gold standard for testing new nibs. Its consistent viscosity and lubricated feel allow the nib to glide without fighting the ink's chemistry. Perform a "Figure-8" test by drawing continuous loops across the page. This verifies smoothness in every direction and reveals any "sweet spot" issues. Watch closely for "railroading," where ink fails to bridge the gap between tines, or hard starts that suggest the nib is set too far forward from the feed's ink channel.
Maintenance for the Long Haul
Frequent swapping is a delight, but it carries a cost. Each removal puts minor stress on the grip section and the feed's friction-fit housing. To avoid unnecessary wear and tear, limit swaps to once every few months rather than daily. Store your spare nibs in protective plastic tubes or padded vials to prevent the tips from striking hard surfaces. Finally, perform a safety check before your first full carry. Gently close the pen and listen for any contact between the nib and the inner cap. A nib that sits too far forward can be crushed by the cap's internal seal, undoing all your careful work in a single second. Proper storage and mindful capping ensure your customized collection remains in pristine condition for years to grow.
Elevate Your Analog Experience
Mastery over your writing tools transforms a simple pen into a bespoke instrument tailored to your unique hand. You've learned that the secret to success lies in meticulous preparation, from establishing a secure workspace to identifying whether your pen uses a modular unit or a friction-fit system. Patience is your most valuable asset during this process. By following these professional techniques, you now understand how to change a fountain pen nib safely while protecting the delicate feeds and gold tines that define your favorite pens.
As an authorized retailer for heritage brands, we take pride in offering a selection curated by stationery connoisseurs who appreciate the fine details of craftsmanship. Every item in our catalog is backed by our passion for quality and our expert-tested maintenance guides. Explore our curated collection of fine fountain pens and interchangeable nibs to begin your next chapter of customization. Your journey toward a perfectly personalized writing experience starts with the right tools and the confidence to use them. Happy writing.
Frequently Asked Questions
Will changing my fountain pen nib void the warranty?
Generally, yes; most manufacturers view nib swapping as a significant modification that voids official coverage. If you damage the feed or crack the section during the process, the brand's repair service will likely charge for the replacement parts. Always check the specific documentation for your heritage brand before proceeding.
How do I know if my fountain pen has a friction-fit or screw-in nib?
Look for visible threads on the nib housing or check the manufacturer's technical specifications. If the entire assembly rotates freely, it's a screw-in unit. Friction-fit systems are pressed directly into the grip section and require a straight pull for removal. Knowing the difference is the first step in learning how to change a fountain pen nib safely without applying incorrect force.
Can I put a gold nib on a pen that originally came with a steel nib?
You can certainly upgrade to a gold nib if the size and housing system are compatible. For example, many pens that use a standard JoWo #6 steel nib can easily accept a 14k or 18k gold replacement from the same manufacturer. This is a common way to enhance the writing experience of a mid-range instrument without purchasing an entirely new pen.
What is the safest way to clean a nib before I store it?
Flush the nib and feed with distilled water until the stream runs clear. For thorough maintenance, a 24-hour soak in a mild pen-flush solution removes stubborn particulates. Ensure the components are completely dry before placing them in a protective vial to prevent oxidation or mold growth during long-term storage.
Is it possible to swap nibs between different brands?
Swapping is only possible if both brands utilize a universal standard like the JoWo or Bock systems. While many boutique makers use these interchangeable units, heritage brands like Pilot, Sailor, and Platinum use proprietary designs. You cannot swap a Pilot nib into a Lamy section because the physical dimensions and feed channels are incompatible.
Why does my new nib feel scratchy even though I followed the swap steps?
Scratchiness often stems from microscopic tine misalignment caused by uneven pressure during reinsertion. Use a jeweler’s loupe to inspect the tips; the tines must be perfectly level with each other. Even a tiny gap or a stray paper fiber trapped in the slit can disrupt the smooth flow you expect from a new point.
What should I do if I accidentally bend a tine during the swap?
Stop immediately and consult a professional nibsmith for repair. Attempting to bend the metal back with household tools often leads to metal fatigue or permanent snapping. A professional has the specific burnishing tools required to realign the metal without leaving unsightly tool marks or ruining the tipping material.
How can I get a better grip on a small nib like the Kaweco Sport?
Use a specialized rubber grip square to increase friction without needing to apply excessive finger pressure. These squares are essential for small, slick components that are difficult to pinch. They provide a 360-degree non-slip surface, which is a key part of how to change a fountain pen nib safely when dealing with pocket-sized instruments.