
Mastering Fountain Pen Sketching Techniques: A 2026 Guide for Enthusiasts
What if your most cherished fountain pen wasn't just a writing tool but a precision instrument for capturing the world in ink? You likely appreciate the tactile glide of a fine nib, yet you might hesitate to use it for art. The fear of damaging a delicate nib with too much pressure or watching a beautiful sketch smudge on poor-quality paper is a common hurdle for many enthusiasts. It's discouraging when your lines feel flat, lacking the expressive depth found in professional gallery work.
You can transform your approach by mastering specific fountain pen sketching techniques designed for the modern artist. This guide provides the professional insights needed to achieve elegant line weight variation and sophisticated ink washes without risking your collection. We'll preview the essential tools for your kit, including high-capacity workhorse pens and the gold standard of Japanese paper. You'll learn how to treat your pen as a versatile sketching partner, moving from cautious strokes to confident, curated artistry.
Key Takeaways
- Understand the mechanics of capillary action and the "Zero-Pressure" rule to protect your nibs from unnecessary wear.
- Master essential fountain pen sketching techniques such as hatching and cross-hatching to build rich, professional textures.
- Explore advanced nib manipulation, including reverse writing and side-strokes, to achieve a dynamic range of line weights.
- Learn to integrate ink washes using premium Pilot Iroshizuku inks and specialized Japanese paper for a painterly finish.
- Curate a professional-grade kit with authorized heritage tools from makers like Sailor, Lamy, and Midori.
The Fundamentals of Fountain Pen Sketching in 2026
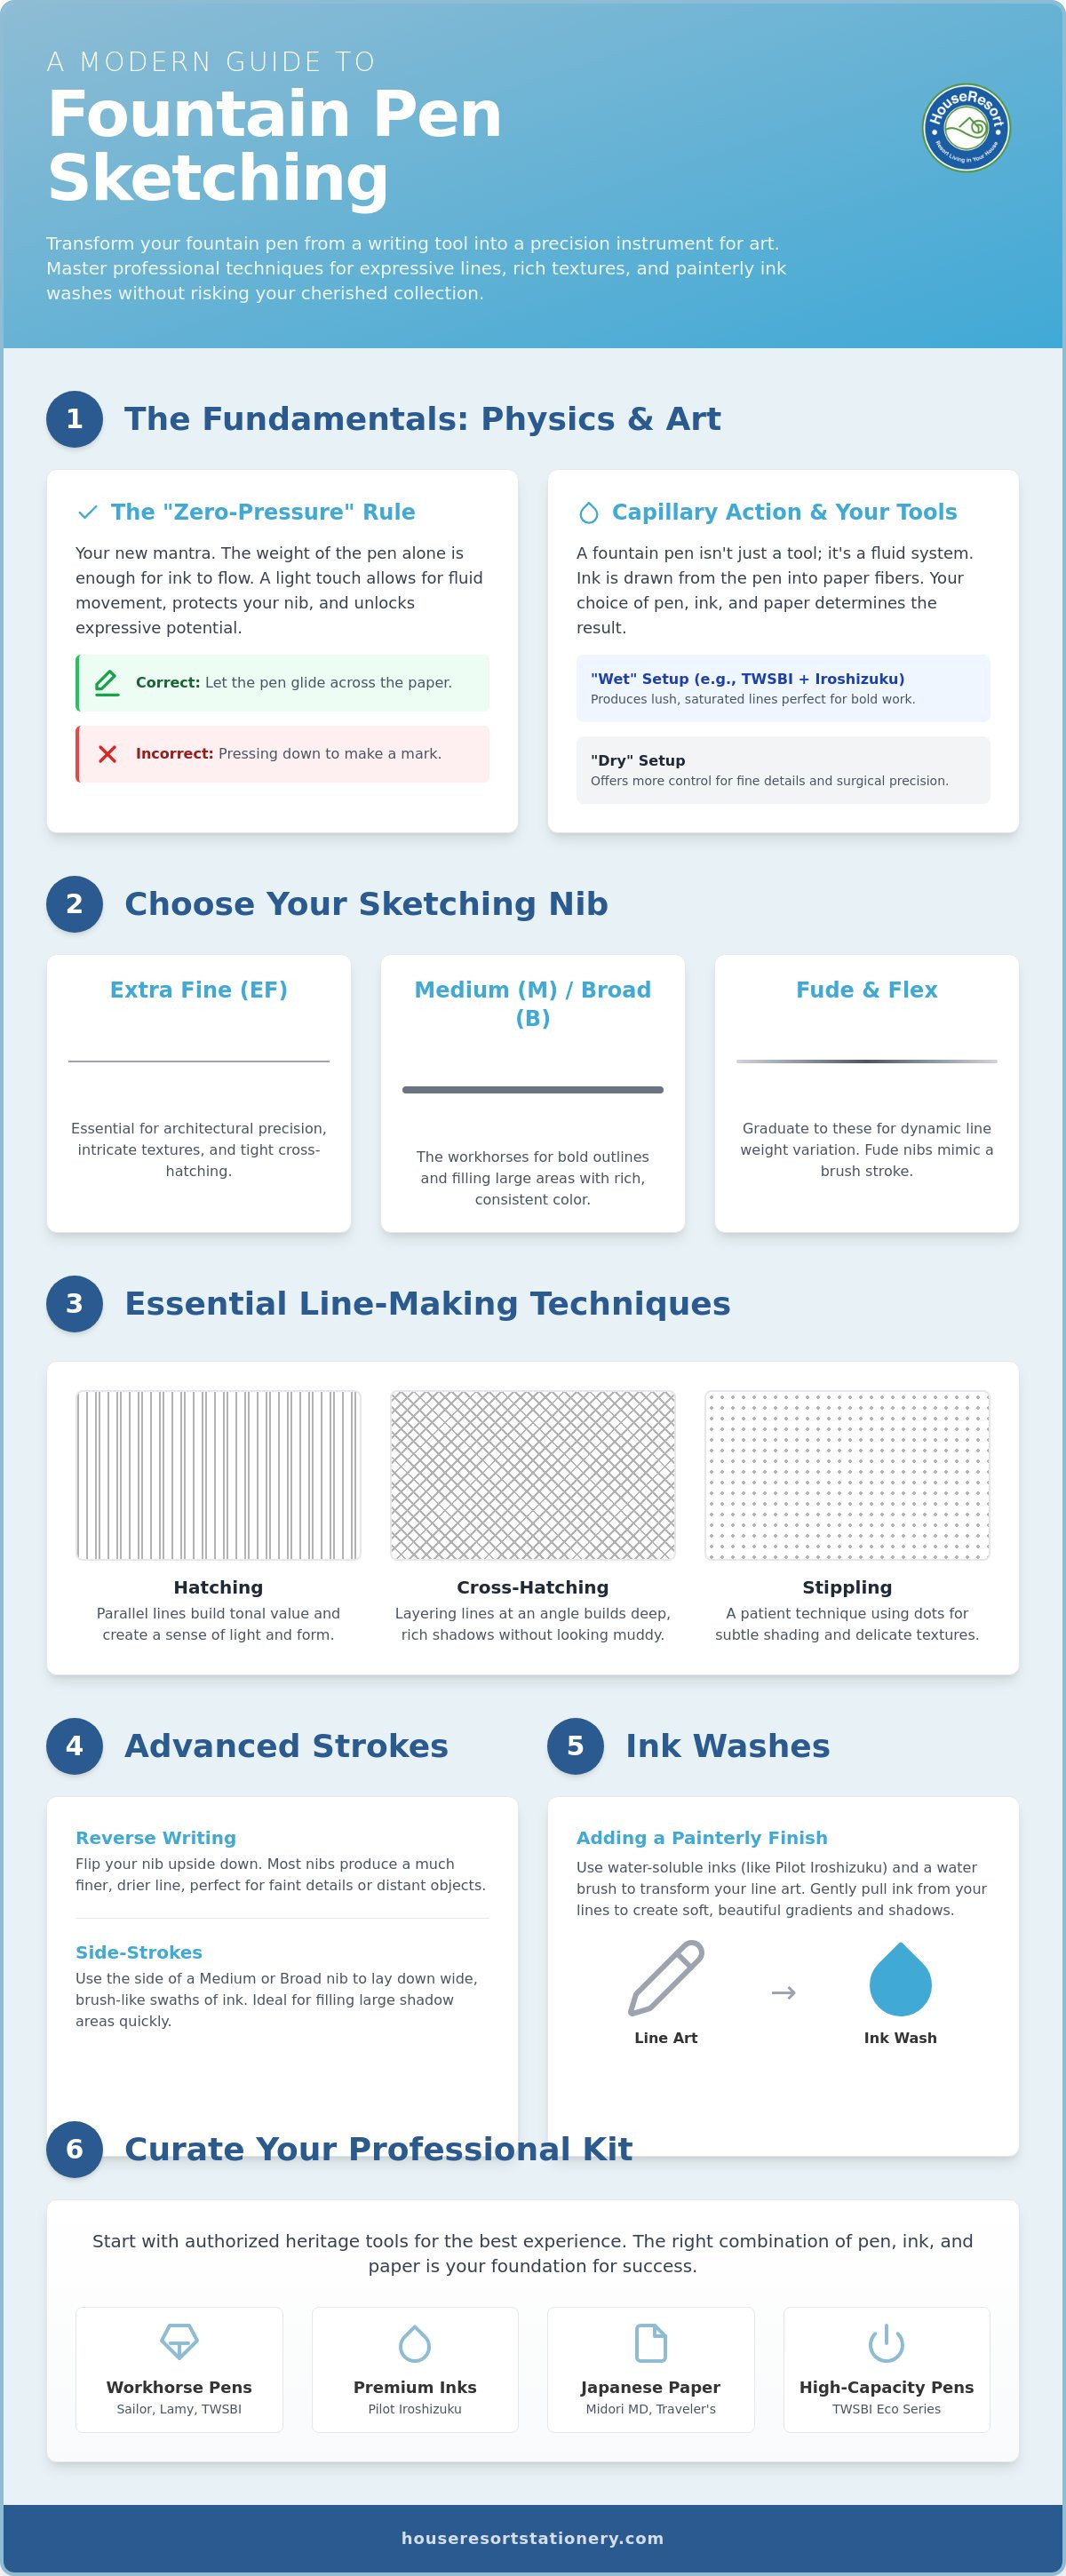
Fountain pen sketching is a dialogue between physics and art. Unlike a ballpoint or a technical liner that relies on friction and downward force, a fountain pen delivers ink through a delicate exchange between the nib and the paper fibers. This is the core of professional fountain pen sketching techniques. If you're transitioning from pencils or markers, the first habit to break is the "heavy hand." You don't need to fight the paper to leave a mark.
The "Zero-Pressure" Rule is your new mantra. The weight of the pen alone should be enough to initiate ink flow. Pressing down doesn't just risk springing the tines of a delicate gold nib; it chokes the feed and flattens the expressive potential of your stroke. A light touch allows for faster, more fluid movements across the page. It preserves the life of your tools while opening up a world of gestural freedom that other instruments simply cannot match.
Understanding your specific setup is essential for consistent results. A "wet" pen, such as a TWSBI Eco filled with Pilot Iroshizuku ink, provides a lush, saturated line that's perfect for bold, confident work. Conversely, a "dry" setup offers more control for surgical details. You aren't just drawing; you're managing a fluid system. Mastering this balance is part of the Fountain pen basics every artist should internalize before moving to complex compositions. The goal is to find a combination that feels like an extension of your own hand.
Tactile feedback is the secret language of the sketcher. Your nib's iridium tip acts as a sensor. As it glides, you'll feel the subtle vibrations of the paper's texture. This feedback tells you exactly how the ink is bonding with the surface. It's a sensory experience that grounds you in the moment, making the act of sketching as rewarding as the finished piece.
Choosing Your First Sketching Nib
- Extra Fine (EF): Essential for architectural precision, intricate textures, and tight cross-hatching where every line must remain distinct.
- Medium (M) and Broad (B): These are the workhorses for bold outlines and filling large areas of shadow with rich, consistent color.
- Fude and Flex: Graduate to these when you're ready for variable line weights. A Fude nib mimics a brush by changing the line width based on the angle of the pen.
Ink and Paper: The Analog Foundation
Standard copier paper is the enemy of quality art. It lacks the sizing necessary to keep ink on the surface, which leads to feathering and ghosting. You need paper designed for the task, such as the Midori MD or Traveler’s Notebook refills. These papers offer the right balance of "tooth" to provide control and "smoothness" to protect your nib. Capillary action is the physical phenomenon where ink is drawn from the pen’s reservoir into the microscopic spaces between paper fibers through surface tension and adhesion.
Essential Line-Making Techniques for Depth and Texture
Once you've internalized the zero-pressure rule, the next step in refining your fountain pen sketching techniques is mastering the architecture of the line. Depth in a sketch isn't created by pressing harder. It's built through the strategic repetition and layering of marks. Hatching serves as the primary building block for tonal value. By maintaining consistent spacing between parallel lines, you create a sense of light and form that feels intentional and polished. Professional artists often use tapered strokes to suggest movement. This involves starting the line with the nib already in motion, touching the paper lightly, and lifting away before the stroke ends. It creates a line that is thickest in the middle and wispy at the ends. For those looking to build muscle memory, fountain pen doodle journaling for beginners offers a low-pressure environment to refine these rhythmic movements daily.
Mastering Hatching and Cross-Hatching
Cross-hatching takes these principles further by layering a second set of parallel lines at an angle to the first. This technique is essential for building deep, rich shadows that don't look muddy. The key is to let the first layer dry slightly to prevent the ink from pooling, especially when using wetter inks like Pilot Iroshizuku. This layered approach is a cornerstone of exploring ink drawing techniques, allowing for a level of detail that graphite often lacks. When you use a high-capacity pen like the TWSBI Eco Year of the Horse 2026 edition, you can focus on these repetitive strokes without worrying about running dry mid-shadow.
Using Stippling for Subtle Shading
Stippling is the most patient of the fountain pen sketching techniques. It involves creating tonal gradients through thousands of tiny dots. Density is everything here. More dots in a concentrated area create deep shadows, while wider spacing suggests highlights. You must use a vertical pecking motion with a very light touch to avoid misaligning the nib tines. Fine (F) or Extra Fine (EF) nibs are the best tools for this task because they provide the precision required for such delicate work. It's a meditative process that rewards a slow, curated approach to art.
Contour drawing rounds out your foundational skills. By following the physical form of your subject with your lines, you imply three-dimensionality. Whether you're sketching the sleek barrel of a Lamy Safari 2026 Neon special edition or a piece of architectural heritage, these lines should wrap around the object's volume. To ensure your lines stay crisp during these detailed exercises, you can browse our collection of premium Japanese notebooks that handle heavy ink loads without feathering.
Advanced Line Manipulation: Beyond the Basic Stroke
Elevating your artistic output requires moving beyond the standard writing grip. Many enthusiasts view a stiff, modern nib as a limitation for creative expression. It's actually a precision tool capable of surprising versatility if you understand its geometry. By mastering the contact points of the nib, you unlock a broader visual vocabulary that adds professional polish to every page of your journal. These fountain pen sketching techniques allow you to extract multiple line weights from a single instrument, reducing the need for a cluttered kit.
The "Side-Stroke" is a prime example of using the nib's physical shape to your advantage. By slightly rotating the pen in your hand and using the shoulder of the iridium tip, you can produce broader, more expressive marks. This is particularly effective for blocking in large shapes or adding bold architectural elements. Your angle of attack also changes the saturation of the line. A vertical pen position creates a precise, needle-like mark, while a 45-degree angle engages more of the feed's capillary power for a richer, wetter deposit of ink.
The "Reverse Nib" Technique for Fine Detail
Reverse writing is perhaps the most underutilized trick in the artist's arsenal. By flipping the pen 180 degrees so the feed faces upward, you contact the paper with the top of the nib's tipping material. This usually produces an ultra-fine, needle-like line that is significantly drier than the standard stroke. It's the perfect solution for adding intricate eye details, distant horizon lines, or delicate highlights in a complex cross-hatched shadow.
You must exercise caution with this maneuver. While rigid steel nibs handle reverse writing with ease, you should never attempt this with soft gold flex nibs or specialized fude nibs. These delicate structures aren't designed for pressure in the opposite direction and can easily become misaligned. For the best results, use a reliable workhorse like a Lamy Safari or a Kaweco Sport, which feature robust steel tips that can withstand this unconventional usage without issue.
Line Weight Variation through Angle and Speed
Velocity is a powerful variable in your fountain pen sketching techniques. The speed of your stroke directly influences how much ink the paper fibers can absorb. Rapid, sweeping movements often result in a "dry brush" effect, where the ink breaks up across the texture of the paper. This is an excellent way to suggest speed, light, or weathered surfaces in your drawings. Conversely, a slow, deliberate stroke allows the feed to fully saturate the line, creating deep and consistent tones.
For high-speed sessions where you're capturing gesture or movement, the TWSBI Eco is an exceptional choice. Its massive ink capacity and reliable piston-filling mechanism keep the feed primed even during rapid-fire drawing. This consistency ensures that your "dry brush" effects are intentional rather than the result of a skipping pen. Mastering this balance of speed and angle turns your fountain pen into a truly dynamic sketching partner.
Working with Ink Washes and Water-Soluble Techniques
The true versatility of a fountain pen reveals itself when you introduce water. While many artists view ink as a permanent commitment, the most sophisticated fountain pen sketching techniques treat the line as a reservoir of potential pigment. By using a water brush, you can dissolve specific strokes into lush, watercolor-like gradients. This approach bridges the gap between drawing and painting, allowing for a controlled flow of tonal values that adds immediate professional depth to your work. Success here depends entirely on your choice of ink. Dye-based inks are your best allies for washes, as their chemistry allows them to "explode" and travel across the paper fibers when touched by moisture.
Choosing the right tool is a matter of chemical intent. If you want your initial lines to remain crisp while adding a light tint over them, you must use a pigmented document ink. However, for most artistic shading, water-soluble options are superior. They allow you to pull shadows directly from your contour lines, creating a cohesive look where the shadow is the same hue as the line itself. This interaction between ink and paper is a nuanced dialogue that requires a "zero-pressure" mindset to avoid damaging the paper surface while it's damp.
Creating Tonal Values with Water-Soluble Inks
Mastering the wash requires a disciplined, three-step approach to ensure your values don't become muddy. This process turns a simple sketch into a curated piece of art.
- Step 1: Draw your primary contour lines using a high-quality dye-based ink. Keep these lines sparse, as you'll be pulling pigment from them later.
- Step 2: Use a water brush to gently touch the lines in areas where you want shadows. The ink will bleed into the wet area, creating a soft gradient.
- Step 3: Once the first wash is partially dry, layer more ink strokes into the deepest shadow regions to build contrast.
For those seeking the most expressive results, our Pilot Iroshizuku Bottled Ink guide explores how these specific formulas offer best-in-class shading and chromatic complexity during the wash process.
Layering Techniques for Atmospheric Perspective
Atmospheric perspective is the secret to creating distance in your sketches. By using very light washes for background elements and keeping high-contrast, sharp lines for the foreground, you mimic how the human eye perceives depth. You can enhance this effect by combining your ink work with other curated tools. For instance, layering washes alongside Blackwing 602 pencils adds a graphite texture that contrasts beautifully with the fluid nature of fountain pen ink. This mixed-media approach provides a tactile richness that single-medium sketches often lack.
Preventing smudging is a matter of patience and paper quality. You must allow each layer to dry completely before applying a second wash, or you risk "pilling" the paper. Using premium Japanese paper like Midori MD is essential here; its unique sizing allows the ink to sit on the surface just long enough for manipulation before it sets. Remember to use the paper's natural color as your brightest highlight. Negative space is your most powerful tool for indicating light. To find the perfect pairing for your next project, shop our curated selection of professional inks and papers.
Curating Your Sketching Kit: The HouseResort Approach
A sophisticated kit is more than a collection of expensive items. It's a curated system where each tool complements the other to support your fountain pen sketching techniques. For those just beginning this analog journey, we recommend the "Starter Trio." This includes the robust Lamy Safari, a Midori MD notebook, and a simple water brush. The Safari's steel nib is forgiving for those learning the zero-pressure rule, while the Midori paper provides the perfect canvas for initial experimentation. It's an accessible entry point that doesn't compromise on the quality of the tactile experience.
Seasoned collectors often graduate to our "Professional Setup." This features the Sailor Pro Gear Slim, known for its legendary gold nib feedback and precision, paired with a Traveler’s Notebook. The Sailor nib allows for minute adjustments in line weight, responding to the lightest touch with absolute consistency. When you're out in the field, the Traveler’s Notebook offers the durability and modularity required by the urban sketcher. It's a setup that values heritage and craftsmanship, turning every sketching session into a rewarding escape.
The TWSBI Eco remains the ultimate artist’s companion for long-form work. As a piston-filler, it boasts a massive ink capacity that far outlasts standard cartridges or converters. This makes it the ideal "workhorse" pen for heavy hatching or detailed landscapes. However, using professional tools requires a commitment to maintenance. If you use pigment-based inks like Platinum Carbon Black for permanent outlines, you must clean your pen at least once a week. This prevents the microscopic particles from clogging the feed, ensuring your ink flow remains as fluid as your creative process.
The Ideal Paper for Sketching and Washes
Paper selection is the most overlooked variable in artistic success. Midori MD paper is the gold standard for ink-wash techniques because of its unique sizing. This treatment allows the paper to handle wet washes without warping or pilling, keeping your gradients smooth. For portability, the Traveler’s Notebook Sketch Inserts provide a heavier weight that stands up to mixed-media demands. You can find more details on these specific pairings in our Japanese stationery online store guide.
Selecting Inks for Sketching Consistency
Your ink palette should be as intentional as your pen choice. We suggest curating a core selection of just two or three colors. A permanent carbon ink is essential for outlines that won't budge when you apply water. Pair this with non-waterproof, dye-based inks like Pilot Iroshizuku for expressive shading and chromatic depth. This limited palette forces you to master fountain pen sketching techniques through value and texture rather than relying on a dozen different hues. It results in a more cohesive, professional aesthetic in your journals and sketchbooks.
Elevating Your Creative Ritual
Mastering fountain pen sketching techniques is a journey of refined tactile awareness. By embracing the zero-pressure rule and exploring the hidden potential of your nib through reverse writing or side-strokes, you turn a simple writing tool into a dynamic artistic partner. The synergy between a well-maintained piston-filler and premium Japanese paper ensures that every wash and cross-hatched shadow remains crisp and professional. These skills allow you to capture the world with a level of detail and character that digital tools can't replicate.
As an authorized retailer for heritage brands like Lamy, TWSBI, and Sailor, we offer a collection that is expertly curated for the analog enthusiast. We specialize in premium Midori and Traveler's Company paper to ensure your ink behaves exactly as intended on every page. Our selection is filtered to present only the best options for artists who value both aesthetic and functional excellence. Explore our curated collection of sketching-ready fountain pens and Japanese paper at HouseResort Stationery.
Your next sketch is an opportunity to slow down and appreciate the craftsmanship of your materials. Pick up your favorite pen, trust the steady flow of the ink, and enjoy the meditative process of creating something unique. The world looks different when you're looking for the right line to define it.
Frequently Asked Questions
Is it okay to draw with a fountain pen?
Yes, fountain pens are exceptional instruments for drawing and offer a unique tactile experience that technical liners cannot match. They provide a continuous ink flow that responds to the lightest touch, allowing for fluid gestural movements. Many professional artists prefer them because they reduce hand fatigue during long sessions while offering a more sophisticated line quality than ballpoints or markers.
How do you shade with a fountain pen without it looking messy?
Clean shading is best achieved by utilizing structured fountain pen sketching techniques such as hatching and stippling. These methods allow you to build tonal density through the repetition of marks rather than heavy ink saturation. It's vital to allow each layer to dry slightly before crossing lines, which prevents the ink from pooling and maintains the crispness of your shadows.
Will sketching ruin my fountain pen nib?
Sketching won't damage your nib as long as you respect the zero-pressure rule. Fountain pens are designed to glide across the surface, so you don't need to press down to initiate flow. Problems only arise if you use excessive force or use a delicate gold nib for aggressive stippling. For heavy-duty art sessions, a robust steel nib like those found on Lamy or Kaweco models is a safe and reliable choice.
What is the best fountain pen ink for sketching and washes?
The best ink depends on your specific goals for the piece. For expressive washes and painterly shading, Pilot Iroshizuku is the premier choice because of its complex color properties and high solubility. If you need a permanent outline that won't budge under watercolor, Platinum Carbon Black is the industry standard for waterproof reliability and deep, matte-black saturation.
Can I use a fountain pen on regular sketchbook paper?
You can use any paper, but regular sketchbook pages often cause feathering or bleed-through because they lack proper sizing. For the best results, you should use specialized Japanese paper like Midori MD or Traveler’s Company inserts. These surfaces are engineered to keep the ink on the top layer, which preserves your fine details and allows for vibrant color representation without ruining the next page.
How do I achieve line variation with a stiff fountain pen nib?
You can achieve variation by adjusting your pen's angle and the speed of your stroke. Holding the pen more vertically creates a thinner, drier line, while a 45-degree angle engages more of the feed for a wetter mark. Mastering these fountain pen sketching techniques allows you to extract multiple line weights from a single "stiff" nib, making your kit more versatile and efficient.
What is the "reverse writing" technique in sketching?
Reverse writing involves flipping the pen over so the feed faces upward, allowing you to draw with the back of the nib. This technique usually produces an ultra-fine, needle-like line that's perfect for microscopic details like distant horizons or hair. It's a legitimate way to get an extra line weight out of your tool, though it's best reserved for sturdy steel nibs rather than soft gold ones.
How often should I clean my sketching fountain pen?
It's best to clean your pen every one to two weeks if you're using pigmented or permanent carbon inks. These formulas contain tiny particles that can settle in the feed if the pen sits idle for too long. If you're using standard dye-based inks, a thorough flush once a month is usually sufficient to keep the capillary action working perfectly and ensure consistent flow.